mvc简介
MVC模式中,M是指业务模型,V是指用户界面,C则是控制器,使用MVC的目的是将M和V的实现代码分离,从而使同一个程序可以使用不同的表现形式。其中,View的定义比较清晰,就是用户界面。
mvc在luci中的使用
在前面我们简单讲解了luci mvc框架,通过mvc架构我们可以非常方便的添加一个模块,业务逻辑更加清晰。在luci框架中我们只需要简单的几行代码就可以实现前后端数据打通,不需要额外的数据解析,也可以自定义模板,实现深度定制。
- view 界面层,用于实现html相关的代码,包括模板
- controller 控制层,实现菜单、接口的定义
- model 数据层,实现与后台数据(uci配置)的绑定
在luci中,controller和model通过lua语言实现,需要一些lua基础语法,当然如果没有复杂业务,依葫芦画瓢就可以实现一个页面,在开发过程中我们不需要把一门语言先学得很精,有点基础后在实际开发过程中查文档即可,语言只是工具。
添加一个标准的luci模块
在第一个实例(hello world)中,我们只是简单加一个菜单实现了html显示,但是没有涉及到具体数据交互,这一节先通过实例演示mvc结构。
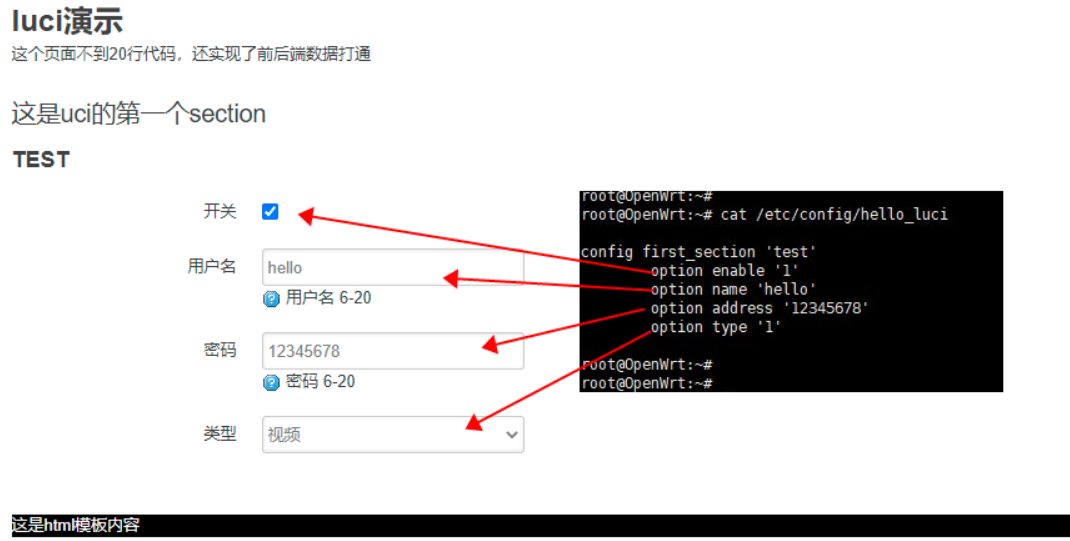
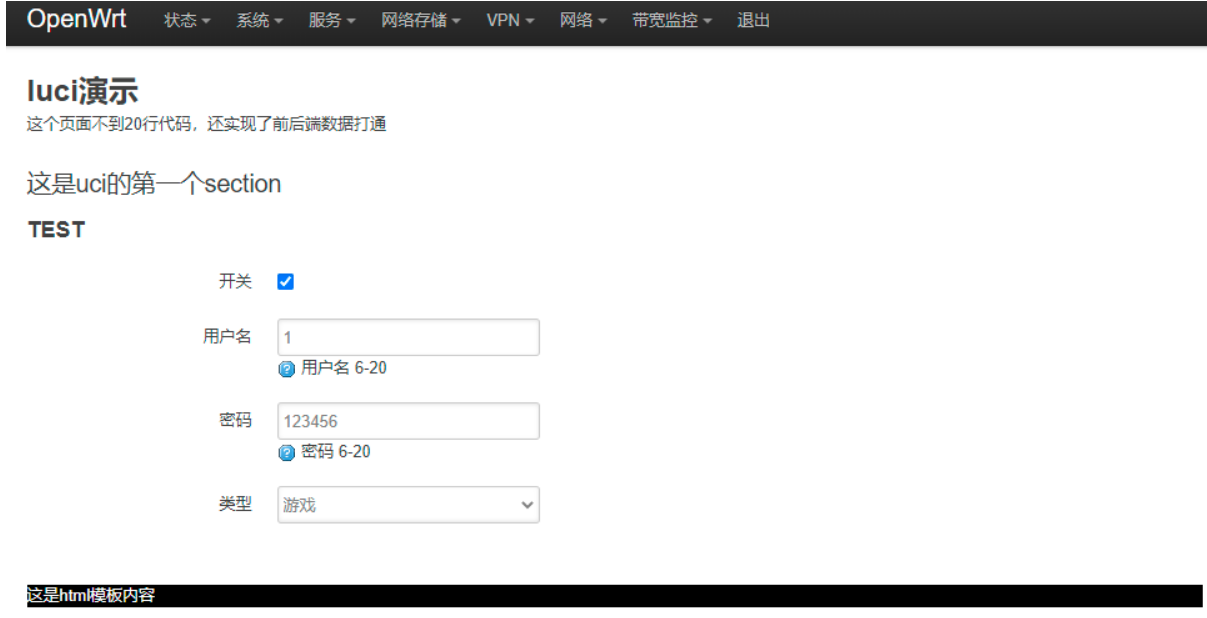
效果展示
以下界面就是一个标准的luci界面,包含了mvc模块代码,并且和openwrt后台uci数据进行了打通,页面修改内容后会提交保存到后台生效,模块代码不超过20行,熟悉模板后开发效率特别高,这就是为什么学习luci框架的原因。
目录结构
在开发过程中我们先直接在luci目录添加模块文件
这里统一命名为hello_luci
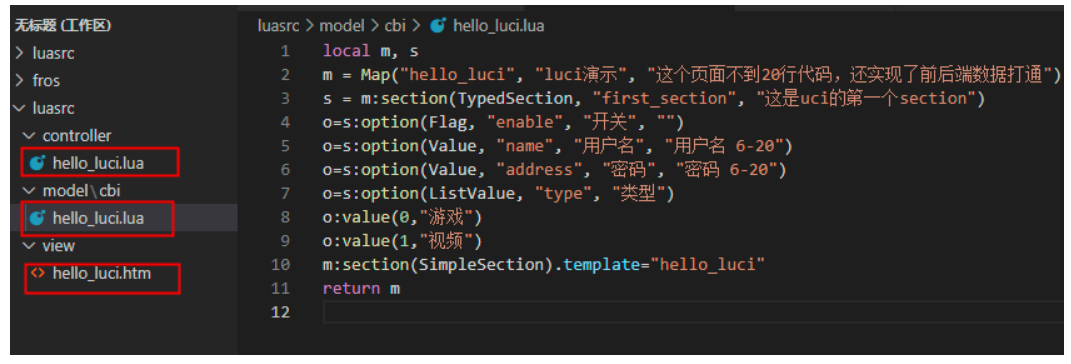
- model文件:/usr/lib/lua/luci/model/cbi/hello_luci.lua
- view文件/usr/lib/lua/luci/view/hello_luci.htm
- controller文件: /usr/lib/lua/luci/controller/hello_luci.lua
如果不习惯在openwrt中直接修改,可以在windows(主机)中创建好对应目录,并写好代码,然后将文件拷贝到luci目录,保证文件如下所示即可
root@OpenWrt:/usr/lib/lua/luci# ls controller/hello_luci.lua
controller/hello_luci.lua
root@OpenWrt:/usr/lib/lua/luci# ls model/cbi/hello_luci.lua
model/cbi/hello_luci.lua
root@OpenWrt:/usr/lib/lua/luci# ls view/hello_luci.htm
view/hello_luci.htm
model代码
local m, s
m = Map("hello_luci", "luci演示", "这个页面不到20行代码,还实现了前后端数据打通")
s = m:section(TypedSection, "first_section", "这是uci的第一个section")
o=s:option(Flag, "enable", "开关", "")
o=s:option(Value, "name", "用户名", "用户名 6-20")
o=s:option(Value, "address", "密码", "密码 6-20")
o=s:option(ListValue, "type", "类型")
o:value(0,"游戏")
o:value(1,"视频")
m:section(SimpleSection).template="hello_luci"
return m
view代码
<html>
	<div style="background-color:black;color:white;"><p>这是html模板内容</p></div>
</html>
controller代码
module("luci.controller.hello_luci", package.seeall)
function index()
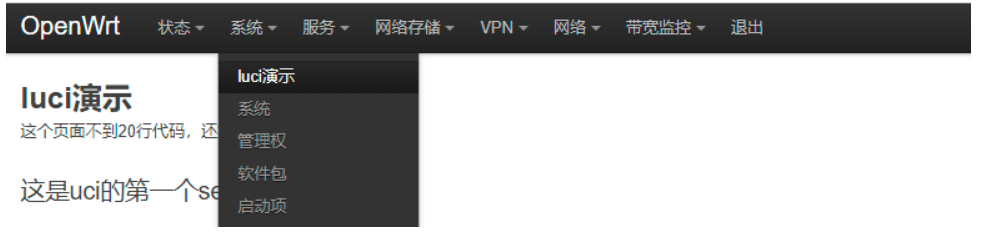
entry({"admin", "system", "hello_luci"}, cbi("hello_luci"), "luci演示" , 1)
end
创建配置文件
一般涉及到保存数据的页面都要有一个配置文件与之对应,配置文件可以理解为数据库,用于配置数据,配置文件格式为uci格式。 创建命令:
touch /etc/config/hello_luci uci set hello_luci.test=first_section uci commit
示例:
root@OpenWrt:~# touch /etc/config/hello_luci
root@OpenWrt:~#
root@OpenWrt:~# uci set hello_luci.test=first_section
root@OpenWrt:~# uci commit
root@OpenWrt:~#
创建完成后可以查看配置文件是否正确 内容如下:
root@OpenWrt:~# cat /etc/config/hello_luci
config first_section 'test'
测试
进入luci页面,填写相关信息并保存
保存后进入后台查看配置文件的内容,配置文件和页面显示对应关系如下: